Showing posts with label hold check. Show all posts

What makes timing paths both setup critical and hold critical

Those timing paths, which are very hard to meet in timing are called timing critical paths. They can be divided into setup and hold timing critical paths.

Setup timing critical paths: Those paths for which meeting setup timing is difficult, can be termed as setup critical timing paths. For these paths, the setup slack value is very close to zero and for the most part of design cycle, remains below zero.

Hold timing critical paths: As is quite obvious, those paths for which meeting hold timing is difficult, are hold critical paths. These paths may require many buffers to meet hold slack equation.

Sometimes, we may encounter some timing paths which are violating in both setup and hold. There is not enough setup slack to make them hold timing clean and vice-versa. The good practice in timing analysis is to identify all such paths as early as possible in design cycle. Let us discuss the scenarios that make timing paths both setup and hold timing critical.

Inherent frequency limit and delay variations: Let us say, we want our chip to remain functional within following PVTs:
Process : Best-case to Worst-case
Voltage : 1.2 V with 10% voltage variation allowed (1.08 V to 1.32 V)
Temperature : -20 degrees to +150 degress
The delay of a standard cell changes with PVTs and OCVs. Let us only talk about PVT variations. Let us say, cell delay changes by 2 times from worst case scenario (worst process, lowest voltage, worst temperature) to best case scenario (best process, highest voltage, best temperature). Let us say, setup and hold checks also scale by same amount. Remember that the equations for setup and hold need to be satisfied across all the PVTs.  Which essentially means setup needs to be ensured for WCS scenario and hold timing needs to be ensured for BCS scenario. This will provide a limit to maximum frequency that the path can be timed at. If we try to go beyond that frequency, we will not be able to ensure both setup and hold slacks remain positive.

Let us illustrate with the help of an example of a timing path from a positive edge-triggered flip-flop to positive edge-triggered flip-flop with a frequency target of 1.4 GHz (clock time period = 714 ps). Let us say, we have the Best-case and Worst-case scenarios as shown in figure 1 and 2.


Figure 1 shows that the best-case clk->q delay for launch flop is 100 ps, best-case combinational delay is 80 ps and best-case hold time is 200 ps. Applying our hold timing equation for this case,

Hold slack = Tck->q  + Tprop - Thold
Hold slack = 100 + 80 - 200
Hold slack = -20 ps
So, in this case, our hold slack comes out to be negative. So, we need to apply the techniques to improve our hold slack. But we need to ensure that our setup slack is sufficiently positive. Let us look at the worst-case scenario to know about our setup slack. If we assume that everything scales by 2 times, the worst-case numbers for clk->q delay, combinational delay and setup/hold time come out to be 200 ps, 160 ps and 400 ps respectively.


Applying setup timing equation for this scenario,
Setup slack = Tperiod - (Tck->q + Tprop + Tsetup)
Setup slack = 714 - 200 - 160 - 400 = -36 ps 

Thus, for the same timing path, both setup and hold slacks are coming out to be negative. For this path, we cannot meet both setup and hold provided all these conditions. One of the solutions could be to use cells with less delay variability. Or we can limit the operating conditions to a tighter range, for instance, 1.15 to 1.25 V instead. This will improve both setup and hold slack values. If this is not an option, the only option left to satisfy timing is to add delay elements to bring hold slack to zero and reduce the frequency as the inherent variations of cells will not allow the path to operate beyond a certain frequency. Let us check at what maximum frequency our timing path will work.

First, we need to ensure hold timing is met. Thus, 
Hold slack >= 0
This translates to Combinational delay (Cb) > 100 ps, or Cb = 100 ps for a hold slack of 0 ps. In other words, worst case combinational delay is 200 ps (2 times scaling).

For a setup slack of 0 ps, operating clock frequency will be maximum; i.e.,

Tperiod(min) = Tck->q + Tprop + Tsetup
Tperiod(min) = 200+ 200 + 400 = 800 ps 
The minimum time period that it can operate at is 800 ps, or a maximum frequency of 1.25 GHz.

In this post, we have discussed how PVT variations in delay can cause a timing path to be both setup and hold critical. Also, we discussed how it limits the frequency of operation. Although the discussion was limited to only PVT variations, OCV variations will add to the variations. The inherent equations will certainly remain same though. Also, we did not take an important parameter into consideration; i.e. clock skew. Can you think of how clock skew between the two flip-flops contribute to maximum achievable clock frequency? Or is it unrelated to clock skew?


Also read:


Setup and hold checks

Setup and hold checks ensure that the finite state machine works in the way as designed. In essence, whole of the timing analysis, be it static or dynamic, revolves around setup and hold checks only. In this post, we will be touching upon setup and hold checks.

What is meant by setup check: Setup check ensures that the design transitions to the next state as desired through the state machine design. Mostly, the setup check is at next active clock edge relative to the edge at which data is launched. Let us call this as default setup check. This is, of course, in correspondence to state machine requirement to transfer to next state and the possibility of meeting both setup and hold checks together in view of delay variations accross timing corners. Figure 1 below shows the setup check for a timing path from positive edge-triggered register to negative edge-triggered register. It shows that the data launched by flop1 on positive edge will be captured by flop2 on the forthcoming negative edge and will update the state of flop2. To do so, it has to be stable at the input of flop2 before the negative edge at least setup time before.


Default setup check for positive edge-triggered register to negative edge-triggered register timing path
Figure 1: Default setup check for a timing path from positive edge-triggered to negative edge-triggered flop


What is meant by hold check: Hold check ensures that the design does not move to the next state before its stipulated time; i.e., the design retains its present state only. The hold check should be one active edge prior to the one at which setup is checked unless there are some architectural care-abouts in the state machine design. The hold check corresponding to default setup check in such a scenario is termed as default hold check. Of course, there are some architectural care-abouts for this to happen. Figure 2 below shows the default hold check corresponding to the default setup check of figure 1. It shows that the data launched on positive edge by flop 1 should be captured by next negative edge and not the previous negative edge.


Default hold timing check for a timing path from positive edge-triggered flip-flop to negative edge-triggered flip-flop
Figure 2: Default hold check for a timing path from positive edge-triggered


Default setup and hold check categories: As discussed above, for each kind of timing path, there is a default setup check and a default hold check that will be inferred unless there is an intended non-default check. We can split the setup and hold checks into following categories for our convenience. Each of the following is a link, which you can visit to know about the default setup and hold checks for each category:


Non-default setup and hold checks: These are formed when the state machine behavior is different than the default intended one. Sometimes, a state machine can be designed causing the setup and hold checks to be non-default. For this to happen, of course, you have to first analyze delay variations across timing corners and ensure that the setup timing equation and hold timing equation are satisfied for all timing corner scenarios. The non-default setup and hold checks can be modeled with the help of multi-cycle path timing constraints. You may wish to go through our posts Multicycle paths - the architectural perspective and Multicycle paths handling in STA to understand some of the concepts related to non-default setup and hold checks.

Setup checks and hold checks for latch-to-flop timing paths

There can be 4 cases of latch-to-flop timing paths as discussed below:
1. Positive level-sensitive latch to positive edge-triggered register: Figure 1 below shows a timing path being launched from a positive level-sensitive latch and being captured at a positive edge-triggered register. In this case, setup check will be full cycle with zero-cycle hold check. Time borrowed by previous stage will be subtracted from the present stage.
Timing path from a positive level-sensitive latch to a positive edge-triggered register
Figure 1: Positive level-sensitive latch to positive edge-triggered register timing path
Timing waveforms corresponding to setup check and hold check for a timing path from positive level-sensitive latch to positive edge-triggered register is as shown in figure 2 below.
Setup and hold checks for timing path from positive level sensitive latch to positive edge triggered register
Figure 2: Setup and hold check waveform for positive latch to positive register timing path
2. Positive level-sensitive latch to negative edge-triggered register: Figure 3 below shows a timing path from a positive level-sensitive latch to negative edge-triggered register. In this case, setup check will be half cycle with half cycle hold check. Time borrowed by previous stage will be subtracted from the present stage.

Timing path from positive level sensitive latch to negative edge triggered register
Figure 3: A timing path from positive level-sensitive latch to negative edge-triggered register
Timing waveforms corresponding to setup check and hold check for timing path starting from positive level-sensitive latch and ending at negative edge-triggered register is shown in figure 4 below:
Timing waveforms corresponding to timing from positive level sensitive latch to negative edge triggered flip-flop
Figure 4: Setup and hold check waveform for timing path from positive latch to negative register


3. Negative level-sensitive latch to positive edge-triggered register: Figure 5 below shows a timing path from a negative level-sensitive latch to positive edge-triggered register. Setup check, in this case, as in case 2, is half cycle with half cycle hold check. Time borrowed by previous stage will be subtracted from the present stage.

Timing path from negative level sensitive latch to positve edge triggered flop
Figure 5: Timing path from negative level-sensitive latch to positive edge-triggered register
Timing waveforms for path from negative level-sensitive latch to positive edge-triggered flop are shown in figure 6 below:
Timing waveform for timing path from negative level sensitive latch to negative edge triggered register
Figure 6: Waveform for setup check and hold check corresponding to timing path from negative latch to positive flop

4. Negative level-sensitive latch to negative edge-triggered register: Figure 7 below shows a timing path from negative level-sensitive latch from a negative edge-triggered register. In this case, setup check will be single cycle with zero cycle hold check. Time borrowed by previous stage will be subtracted from present stage.

Timing path from negative level sensitive latch to negative edge triggered register
Figure 7: Timing path from negative latch to negative flop
Figure 8 below shows the setup check and hold check waveform from negative level-sensitive latch to negative edge-triggered flop.

Timing waveform for timing path strating from negative level sensitive latch and ending at negative edge-triggered register
Figure 8: Timing waveform for path from negative latch to negative flip-flop


Can hold check be frequency dependant?


We often encounter people argue that hold check is frequency independent. However, it is only partially true. This condition is true only for zero-cycle hold checks. By zero cycle hold checks, we mean that the hold check is performed on the same edge at which it is launched. This is true in case of timing paths between same polarity registers; e.g. between positive edge-triggered flops. Figure 1 below shows timing checks for a data-path launched from a positive edge-triggered flip-flop and captured at a positive edge-triggered flip-flop. The hold timing, in this case, is checked at the same edge at which data is launched. Changing the clock frequency will not cause hold check to change.

Setup check for positive edge-triggered flip-flop to positive edge-triggered flip-flop is single cycle and hold check is zero cycle
Figure 1: Setup and hold checks for positive edge-triggered to positive edge-triggered flip-flop
Most of the cases in today’s designs are of this type only. The exceptions to zero cycle hold check are not too many. There are hold checks for previous edge also. However, these are very relaxed as compared to zero cycle hold check. Hence, are not mentioned. Also, hold checks on next edge are impossible to be met considering cross-corner delay variations. So, seldom do we hear that hold check is frequency dependant. Let us talk of different scenarios of frequency dependant hold checks:

  1.  From positive edge-triggered flip-flop to negative edge-triggered flip-flop and vice-versa: Figure 2 below shows the setup and hold checks for a timing path from positive edge-triggered flip-flop to a negative edge-triggered flip-flop. Change in frequency will change the distance between the two adjacent edges; hence, hold check will change. The equation for hold timing will be given for below case as:

Tdata + Tclk/2 > Tskew + Thold
or
Tslack =  Tclk/2 - Thold - Tskew + Tdata
          Thus, clock period comes into picture in calculation of hold timing slack.

Both setup and hold checks are half cycle. Setup is checked on next edge whereas hold is checked on previous edge
Figure 2: Setup and hold checks for timing path from positive edge-triggered flip-flop to negative edge-triggered flip-flop

Similarly, for timing paths launching from negative edge-triggered flip-flop and being captured at positive edge-triggered flip-flop, clock period comes into picture. However, this check is very relaxed most of the times. It is evident from above equation that for hold slack to be negative, the skew between launch and capture clocks should be greater than half clock cycle which is very rare scenario to occur. Even at 2 GHz frequency (Tclk = 500 ps), skew has to be greater than 250 ps which is still very rare.
Coming to latches, hold check from a positive level-sensitive latch to negative edge-triggered flip-flop is half cycle. Similarly, hold check from a negative level-sensitive latch to positive edge-triggered flip-flop is half cycle. Hence, hold check in both of these cases is frequency dependant.

2. Clock gating hold checks: When data launched from a negative edge-triggered flip-flop gates a clock on an OR gate, hold is checked on next positive edge to the edge at which data is launched as shown in figure 3, which is frequency dependant.

Setup check is single cycle and hold check is half cycle and checked on next clock edge with respect to launch clock edge
Figure 3: Clock gating hold check between data launched from a negative edge-triggered flip-flop and and clock at an OR gate

           Similarly, data launched from positive edge-triggered and gating clock on an AND gate form half cycle hold. However, this kind of check is not possible to meet under normal scenarios considering cross-corner variations.

3)      Non-default hold checks: Sometimes, due to architectural requirements (e.g. multi-cycle paths for hold), hold check is non-zero cycle even for positive edge-triggered to positive edge-triggered paths as shown in figure 4 below.
Figure 4: Non-default hold check with multi-cycle path of 1 cycle specified


Multicycle paths : The architectural perspective


Definition of multicycle paths: By definition, a multi-cycle path is one in which data launched from one flop is allowed (through architecture definition) to take more than one clock cycle to reach to the destination flop. And it is architecturally ensured either by gating the data or clock from reaching the destination flops. There can be many such scenarios inside a System on Chip where we can apply multi-cycle paths as discussed later. In this post, we discuss architectural aspects of multicycle paths. For timing aspects like application, analysis etc, please refer Multicycle paths handling in STA.

Why multi-cycle paths are introduced in designs: A typical System on Chip consists of many components working in tandem. Each of these works on different frequencies depending upon performance and other requirements. Ideally, the designer would want the maximum throughput possible from each component in design with paying proper respect to power, timing and area constraints. The designer may think to introduce multi-cycle paths in the design in one of the following scenarios:
      
       1)      Very large data-path limiting the frequency of entire component: Let us take a hypothetical case in which one of the components is to be designed to work at 500 MHz; however, one of the data-paths is too large to work at this frequency. Let us say, minimum the data-path under consideration can take is 3 ns. Thus, if we assume all the paths as single cycle, the component cannot work at more than 333 MHz; however, if we ignore this path, the rest of the design can attain 500 MHz without much difficulty. Thus, we can sacrifice this path only so that the rest of the component will work at 500 MHz. In that case, we can make that particular path as a multi-cycle path so that it will work at 250 MHz sacrificing the performance for that one path only.
     
     2)      Paths starting from slow clock and ending at fast clock: For simplicity, let us suppose there is a data-path involving one start-point and one end point with the start-point receiving clock that is half in frequency to that of the end point. Now, the start-point can only send the data at half the rate than the end point can receive. Therefore, there is no gain in running the end-point at double the clock frequency. Also, since, the data is launched once only two cycles, we can modify the architecture such that the data is received after a gap of one cycle. In other words, instead of single cycle data-path, we can afford a two cycle data-path in such a case. This will actually save power as the data-path now has two cycles to traverse to the endpoint. So, less drive strength cells with less area and power can be used. Also, if the multi-cycle has been implemented through clock enable (discussed later), clock power will also be saved.

Implementation of multi-cycle paths in architecture: Let us discuss some of the ways of introducing multi-cycle paths in the design:

      1)      Through gating in data-path: Refer to figure 1 below, wherein ‘Enable’ signal gates the data-path towards the capturing flip-flop. Now, by controlling the waveform at enable signal, we can make the signal multi-cycle. As is shown in the waveform, if the enable signal toggles once every three cycles, the data at the end-point toggles after three cycles. Hence, the data launched at edge ‘1’ can arrive at capturing flop only at edge ‘4’. Thus, we can have a multi-cycle of 3 in this case getting a total of 3 cycles for data to traverse to capture flop. Thus, in this case, the setup check is of 3 cycles and hold check is 0 cycle.
Figure 1: Introducing multicycle paths in design by gating data path


    Now let us extend this discussion to the case wherein the launch clock is half in frequency to the capture clock. Let us say, Enable changes once every two cycles. Here, the intention is to make the data-path a multi-cycle of 2 relative to faster clock (capture clock here). As is evident from the figure below, it is important to have Enable signal take proper waveform as on the waveform on right hand side of figure 2. In this case, the setup check will be two cycles of capture clock and hold check will be 0 cycle.
   
   
When the launch clock is half in frequency, it is better to make the path a multicycle of 2 because data will anyways be launched once every few cycles.
Figure 2: Introducing multi-cycle path where launch clock is half in  frequency to capture clock


        2) Through gating in clock path: Similarly, we can make the capturing flop capture data once every few cycles by clipping the clock. In other words, send only those pulses of clock to the capturing flip-flop at which you want the data to be captured. This can be done similar to data-path masking as discussed in point 1 with the only difference being that the enable will be masking the clock signal going to the capturing flop. This kind of gating is more advantageous in terms of power saving. Since, the capturing flip-flop does not get clock signal, so we save some power too.
    
Figure 3: Introducing multi cycle paths through gating the clock path
      Figure 3 above shows how multicycle paths can be achieved with the help of clock gating. The enable signal, in this case, launches from negative edge-triggered register due to architectural reasons (read here). With the enable waveform as shown in figure 3, flop will get clock pulse once in every four cycles. Thus, we can have a multicycle path of 4 cycles from launch to capture. The setup check and hold check, in this case, is also shown in figure 3. The setup check will be a 4 cycle check, whereas hold check will be a zero cycle check.

Pipelining v/s introducing multi-cycle paths: Making a long data-path to get to destination in two cycles can alternatively be implemented through pipelining the logic. This is much simpler approach in most of the cases than making the path multi-cycle. Pipelining means splitting the data-path into two halves and putting a flop between them, essentially making the data-path two cycles. This approach also eases the timing at the cost of performance of the data-path. However, looking at the whole component level, we can afford to run the whole component at higher frequency. But in some situations, it is not economical to insert pipelined flops as there may not be suitable points available. In such a scenario, we have to go with the approach of making the path multi-cycle.

References:


Setup time and hold time basics

In digital designs, each and every flip-flop has some restrictions related to the data with respect to the clock in the form of windows in which data can change or not. There is always a region around the clock edge in which input data should not change at the input of the flip-flop. This is because, if the data changes within this window, we cannot guarantee the output. The output can be the result of either of the previous input, the new input or metastability (as explained in our post  'metastability'). This window is marked by two boundary lines, one pertaining to the setup time of the flop, the other to the hold time defined as below.

Definition of Setup time: Setup time is defined as the minimum amount of time before the clock's active edge that the data must be stable for it to be latched correctly. In other words, each flip-flop (or any sequential element, in general) needs some time for the data to remain stable before the clock edge arrives, such that it can reliably capture the data. This duration is known as setup time.
The data that was launched at the previous clock edge should be stable at the input at least setup time before the clock edge. So, adherence to setup time ensures that the data launched at previous edge is captured properly at the current edge. In other words, we can also say that setup time adherence ensures that the system moves to next state smoothly. 
Definition of Hold time: Hold time is defined as the minimum amount of time after the clock's active edge during which data must be stable. Similar to setup time, each sequential element needs some time for data to remain stable after clock edge arrives to reliably capture data. This duration is known as hold time.
The data that was launched at the current edge should not travel to the capturing flop before hold time has passed after the clock edge. Adherence to hold time ensures that the data launched at current clock edge does not get captured at the same edge. In other words, hold time adherence ensures that system does not deviate from the current state and go into an invalid state.
As shown in the figure 1 below, the data at the input of flip-flop can change anywhere except within the seup time hold time window. 

Figure showing the setup and hold requirements forming a timing window during which data cannot toggle
Figure 1: Setup-hold window


A D-latch is composed of two inverters, connected in positive feedback loop which is tristated when input data path is enabled. On the other hand, when data path is tristated, this loop is enable
A D-type latch

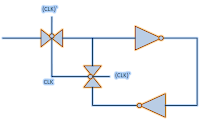
Cause/origin of setup time and hold timeSetup time and hold time are said to be the backbone of timing analysis. Rightly so, for the chip to function properly, setup and hold timing constraints need to be met properly for each and every flip-flop in the design. If even a single flop exists that does not meet setup and hold requirements for timing paths starting from/ending at it, the design will fail and meta-stability will occur. It is very important to understand the origin of setup time and hold time as whole design functionality is ensured by these. Let us discuss the origin of setup time and hold time taking an example of D-flip-flop as in VLSI designs, D-type flip-flops are almost always used. A D-type flip-flop is realized using two D-type latches; one of them is positive level-sensitive, the other is negative level-sensitive. A D-type latch, in turn, is realized using transmission gates and inverters. Figure below shows a positive-level sensitive D-type latch. Just inverting the transmission gates’ clock, we get negative-level sensitive D-type latch.

A complete D flip-flop using the above structure of D-type latch is shown in figure below:

 A D-type flip-flop consists of two latches connected back to back in master-slave format
A D-type flip-flop


Now, let us get into the details of above figure. For data to be latched by ‘latch 1’ at the falling edge of the clock, it must be present at ‘Node F’ at that time. Since, data has to travel ‘NodeA’ -> ‘Node B’ -> ‘Node C’ -> ‘Node D’ -> ‘Node E’ -> ‘Node F’ to reach ‘Node F’, it should arrive at flip-flop’s input (Node A) at some earlier time. This time for data to reach from ‘Node A’ to ‘Node F’ is termed as data setup time (assuming CLK and CLK' are present instantaneously. If that is not the case, it will be accounted for accordingly). Similarly, it is necessary to ensure a stable value at the input to ensure a stable value at ‘Node C’. In other words, hold time can be termed as delay taken by data from ‘Node A’ to ‘Node C’.

Setup and hold checks in a design: Basically, setup and hold timing checks ensure that a data launched from one flop is captured at another properly. Considering the way digital designs of today are designed (finite state machines), the next state is derived from its previous state.  So, data launched at one edge should be captured at next active clock edge. Also, the data launched from one flop should not be captured at next flop at the same edge. These conditions are ensured by setup and hold checks. Setup check ensures that the data is stable before the setup requirement of next active clock edge at the next flop so that next state is reached. Similarly, hold check ensures that data is stable until the hold requirement for the next flop for same clock edge has been met so that present state is not corrupted.

A timing path from rise edge-triggered flip-flop to rise edge-triggered flip-flop
A sample path in a design
Shown above is a flop-to-flop timing path. For simplicity, we have assumed that both the flops are rise edge triggered. The setup and hold timing relations for the data at input of second flop can be explained using the waveforms below:


waveform showing setup and hold requirement for the sample timing path shown above
Figure showing setup and hold checks being applied for the timing path shown above


As shown, data launched from launching flop is allowed to arrive at the input of the second flop only after a delay greater than its hold requirement so that it is properly captured. Similarly, it must not have a delay greater than (clock period – setup requirement of second flop). In other words, mathematically speaking, setup check equation is given as below (assuming zero skew between launch and capture clocks):
                                Tck->q + Tprop + Tsetup < Tperiod
 Similarly, hold check equation is given as:
                               Tck->q  + Tprop > Thold

If we take into account skews between the two clocks, the above equations are modified accordingly. If Tskew is the skew between launch and capture flops, (equal to latency of clock at capture flop minus latency of clock at launch flop so that skew is positive if capture flop has larger latency and vice-versa), above equations are modified as below:
                    
                      Tck->q + Tprop + Tsetup - Tskew < Tperiod
                      Tck->q  + Tprop > Thold + Tskew

Setup checks and hold checks for reg-to-reg paths explains different cases covering setup and hold checks for flop-to-flop paths.

What if setup and/or hold violations occur in a design: As said earlier, setup and hold timings are to be met in order to ensure that data launched from one flop is captured properly at the next flop at next clock edge so as to transfer the state-machine of the design to the next state. If the setup check is violated, the data will not be captured at the next clock edge properly. Similarly, if hold check is violated, data intended to be captured at the next edge will get captured at the same edge. Setup hold violations can also lead to data changing within setup/hold window of the capturing flip-flop. It may lead to metastability failure in the design (as explained in our post 'metastability'). So, it is necessary to have setup and hold requirements met for all the flip-flops in the design and there should not be any setup/hold violation.
What if you fabricate a design without taking care of setup/hold violations: If you fabricate a design having setup violations, you can still use it by lowering the frequency as the equation involves the variable clock frequency. On the other hand, a design with hold violation cannot be run properly. So, if you fabricate a design with an accidental hold violation, you will have to simply throw away the chip (unless the hold path is half cycle as explained here). A design with half cycle hold violations only can still be used at lower frequencies.

Tackling setup time violation As given above, the equation for setup timing check is given as:
            Tck->q + Tprop + Tsetup - Tskew < Tperiod

The parameter that represents if there is a setup time violation is setup slack. The setup slack can be defined as the difference between the L.H.S and R.H.S. In other words, it is the margin that is available such that the timing path meets setup check. The setup slack equation can be given as:
            Setup slack = Tperiod -  (Tck->q + Tprop + Tsetup - Tskew)
If setup slack is positive, it means there is still some margin available in the timing path. On the other hand, a negative slack means that the paths violates setup timing check by the amount of setup slack. To get the path met, either data delay should be decreased or clock period should be increased.

Mitigating setup violation: Thus, we can meet the setup requirement, if violating, by 
1. Decreasing clk->q delay of launching flop 
2. Decreasing the propagation delay of the combinational cloud 
3. Reducing the setup time requirement of capturing flop 
4. Increasing the skew between capture and launch clocks
5. Increasing the clock period

Tackling hold time violation: Similarly, the equation for hold timing check is as below:
            Tck->q + Tprop > Thold + Tskew
The parameter that represents if there is a hold timing violation is hold slack. The hold slack is defined as the amount by which L.H.S is greater than R.H.S. In other words, it is the margin by which timing path meets the hold timing check. The equation for hold slack is given as:
            Hold slack = Tck->q + Tprop - Thold - Tskew
If hold slack is positive, it means there is still some margin available before it will start violating for hold. A negative hold slack means the path is violating hold timing check by the amount represented by hold slack. To get the path met, either data path delay should be increased, or clock skew/hold requirement of capturing flop should be decreased.

Mitigating hold violation: We can meet the hold requirement by:
  1. Increasing the clk->q delay of launching flop
  2. Decreasing the hold requirement of capturing flop
  3.  Decreasing clock skew between capturing clock and launching flip-flops
Also read: